Why Roof Repair Is Essential After Storms

During high wind, rain and hail storms, your roof can suffer damage that could lead to water leaks and other issues. Look for obvious signs like sagging areas, dents in your siding or shrubbery and water spots on the ceiling. 

Roof Repair

Get a ladder and go up into the attic to inspect your roof. It may seem daunting, but every day you wait is another day your roof gets worse. Visit Website to learn more.

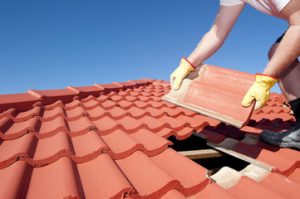
The shingles on your roof serve as your home’s first line of defense against the elements. A worn or damaged shingle can weaken this defense and lead to water penetration, structural damage and even mold growth. Oftentimes, this is the first indication of a problem that can snowball into more costly issues like roof leaks. Whether it’s from storms, age or simply wear and tear, it is essential to address any shingle damage right away to prevent a small issue from becoming a major headache.

Shingles can be repaired with some simple tools and materials. In addition to the basic tools for roof repair—such as a hammer, flat pry bar and utility knife—you will also need a bundle of standard three-tab shingles in a color that matches your roof. If you have some leftover shingles from the last time your roof was worked on, they may be a good fit for the job (though be sure to inspect them carefully and remove any that are missing or curled). If not, you can buy a bundle at most home centers or lumberyards. The important thing is to have the shingles ready before you spot any damage, so that you can get them in place quickly and prevent further damage.

A shingle’s most common sign of trouble is cracking, which can be caused by extreme weather conditions or prolonged exposure to the sun’s UV rays. Each crack is a new entrance point for moisture and may lead to the need for more extensive repairs, such as leaks and potential water damage.

Another common symptom of deteriorating shingles is the presence of moss or plant growth. As these organisms grow, they can cling to the shingles and cause additional damage by trapping moisture and preventing the shingles from drying properly. To combat this, it’s important to regularly inspect the roof for moss and plant growth, as well as to maintain proper ventilation in the attic to keep moisture from building up.

A final common shingle problem is blistering, which can be caused by excessive heat or poor ventilation. This condition leads to the shingle’s outer layer melting, which exposes the underlayment and can result in a leaky roof. The good news is that blistering is an easy and relatively inexpensive fix, though the more widespread the damage, the more likely it is that a roof replacement will be necessary.

Damaged Flashing

Flashing is a metal barrier that prevents water from seeping into the attic and causing mold. It is located around roof edges, chimneys, vents, and skylights. Flashing is vulnerable to high winds and should be regularly inspected for signs of damage or wear.

Depending on the extent of the damage to your flashing, it may be possible for you to fix it yourself using roofing cement. However, it is always a good idea to call a roofer if there is any visible damage to the flashing. They will be able to climb up on your roof and evaluate the damage, look for collateral damage, and let you know what needs to be done to repair it.

If you are repairing your own flashing, make sure to use the correct type of flashing and roofing cement. You will also need to remove any damaged sections of the flashing, clean the area thoroughly, and apply a fresh layer of roofing cement. When replacing the flashing, it is a good idea to use galvanized steel flashing that is durable and corrosion-resistant.

When repairing roof flashing, you should also make sure to replace any shingles that were removed to get to the flashing. This will ensure that the shingles are properly aligned and secure, and that there are no gaps or loose areas where water could leak through. It is a good idea to apply a waterproof sealant to the entire area of the roof where the flashing is located, to ensure a tight and secure seal.

It is important to keep in mind that working on a roof can be dangerous, even for experienced homeowners. Attempting to repair the flashing on your roof without the proper experience can result in further damage to the roof and your property, as well as injury or even death. It is therefore important to have a professional roofer like Lyons Roofing inspect your roof and the flashing at least once per year, and to repair any damage promptly.

When you are repairing or replacing your roof flashing, it is important to document the process. This will help you keep track of the work that has been done, and can be useful for future reference or warranty claims. Be sure to take before-and-after pictures of the repairs, and keep a record of the materials used and any professional services that were hired. This will help you to avoid expensive repairs in the future, and it will also be beneficial for your home insurance claim should a claim need to be filed.

Missing Shingles or Tabs

Shingles form the first line of defense against rain, snow, wind and other environmental threats. Getting them repaired promptly after a storm will keep your home from suffering water damage. When shingles go missing, your roof’s underlayment becomes exposed and can allow water to seep into the insulation and cause mold growth and structural problems.

A shingle can be completely blown off by the wind, or it may only lose one of its tabs. This type of failure usually happens when the fasteners holding the shingle are pulled loose or weakened by wind. In some cases, the fasteners are not installed properly or they are made of poor quality materials that don’t hold up to weathering.

When only a single shingle tab is lost, it’s likely that the other tabs are still in place and the roof is safe. However, if the roof has been subjected to intense winds and the other tabs are also flipped up, it’s time to call in a professional roofing contractor.

Ideally, you should inspect your roof in the early morning after a big storm. Before getting up on your ladder, check the ground for shingle fragments that have fallen off. This will help you determine the extent of the roof damage, which components failed and why they failed.

You should also look for shingles that have been pushed up into the valleys. In some instances, the edges of a shingle are pushed up into the valleys and they can create gaps that let in moisture.

Another common problem is when the shingle’s adhesive strips are compromised. This can happen when the shingle’s protective granule layer is worn down, or it’s been exposed to harsh chemicals such as bleach or oil-based paints.

If you’re feeling confident and have some experience with DIY projects, it’s possible to patch a hole in your roof yourself by using a shingle strip that is the same size as the old one and then nailing it in place. It’s important to note that this is a temporary fix and you should have the damaged area inspected by a professional to avoid more expensive problems down the road.

Water Damage

Water damage from a roof leak can impact more than just the look and feel of your interior. It can cause problems with the foundation, walls, and ceilings of your structure, as well as affecting plumbing systems and electrical components. A leaking roof can also create mold and mildew, which pose health issues for you and your family. Water damage also compromises insulation, leading to higher energy bills. If you notice signs of a leaking roof, such as bubbled paint on the ceiling or walls or a musty smell in an upstairs room, you should call a professional right away.

It is possible to save some money on repair costs if you catch leaks early, before they do much damage. If you suspect a leak, start by checking easy-to-access areas, such as the attic or crawl space and looking for signs of moisture. Check for sagging spots in the attic or ceiling, and for wet areas around light fixtures, electrical boxes, or vents. You may need to replace drywall, insulation, or water supply lines that are affected by the leak.

Leaks can be caused by many different factors, including strong winds and large hail causing missing or damaged shingles and allowing water to seep into the attic or ceilings. Ice dams are another common culprit, forming when gutters become clogged and melting snow backs up under shingles. These issues can usually be prevented with regular maintenance and proper gutter cleaning and installation.

A professional roofer can inspect your home or business and find the source of the leak, and then make repairs as needed. They can also add protective barriers to prevent future damage and ensure the longevity of your roof and all of its components.

You should make a habit of regularly searching for leaks and other potential issues, especially after storms and on a consistent basis as the seasons change. In addition to preventing leaks, you can also lower your insurance rates if you have a quality roof and keep up with regular inspections.

How to Plan a Successful Bathroom Remodel

Bathroom Remodel is a project that requires careful planning and thoughtful choices. From layouts to material selection, we have the tools you need for a successful remodel!

Bathroom Remodel

Unlike a cosmetic refresh, remodeling will add value to your home. It is also the perfect opportunity to incorporate universal design upgrades that will make your home more accessible for you as you age. Contact San Jose Adu Builder & Room Addition for professional help.

A bathroom remodel is one of the best ways to add value to your home. It also has the potential to increase your daily comfort and improve your quality of life. However, the scope and complexity of your project can significantly impact the final cost. To make sure you budget for the right amount of work, start by identifying your goals and assessing your finances.

Then, prioritize elements like fixtures, tiles, or custom features to allocate your budget effectively. It’s also important to consider any hidden costs, like water damage or mold remediation, that may come up during demolition. Finally, don’t forget to set aside 10-15% of your total renovation cost for unforeseen expenses or cost overruns.

There are two common types of bathroom remodeling projects: renovate or remodel. A renovation is less extensive than a remodel and involves cosmetic changes. This could include putting in new flooring, painting cabinetry, or installing a new mirror. A remodel, on the other hand, is more construction-heavy and includes major changes to a bathroom’s layout or function.

The cost of your bathroom remodel depends on the size of the space, the materials you choose, and whether you decide to upgrade any components. For example, a larger bathroom will typically cost more than a small jack-and-jill suite. Additionally, high-end materials can significantly increase the cost of your remodel.

Another cost factor is the scope of the work and whether you need to hire a professional. If your remodel includes a complete overhaul of the wet area, you’ll likely need to hire a plumber or electrician to install new pipes and electrical wiring.

It’s also important to consider the potential impact on your energy bill. Replacing old toilets and showers with low-flow options and switching to LED light fixtures will save money on your monthly utility bills.

Finally, don’t forget to factor in the cost of a permit. In most cases, a permit is required for any structural or plumbing changes. If you’re unsure whether your remodel requires a permit, consult with your contractor or your local planning or building department.

Design

Often, the first step in a bathroom remodel is to design the layout. This determines where each of the fixtures will be located within the room. This is especially important for a bathroom that will be used frequently by more than one person, as it helps to create an efficient layout. For example, the sink should be positioned near the door, since it will be used to wash hands before and after using the toilet and to get ready for the day.

Once the layout has been decided upon, it’s time to select the finishes and decor. This will help to set the mood of the space and tie the overall look together. For example, if you like a clean, modern style, consider selecting polished chrome fixtures and white marble countertops. To add a bit of interest, try choosing a unique tile pattern or color.

Another important consideration when designing a bathroom is to account for storage space. Open shelving or built-in niches can be great places to display decorative towels and other items. Closed storage options such as cabinets and drawers are also a good way to store toiletries and other personal items.

The lighting in a bathroom is very important, as it sets the tone for the space and can dramatically affect its functionality. Consider using dimmer switches to allow you to control the amount of light in the room at any given time. Additionally, be sure to include both task and ambient lighting to ensure that the space is well-lit for tasks like shaving and applying makeup.

While you may have a general idea of how you want your bathroom to look, it’s always helpful to have a detailed design plan to guide the construction process. This will help to minimize any misunderstandings between you and your contractor and make sure that the final product is exactly what you’re hoping for. It can be particularly helpful to have a visual representation of your remodel, such as a 3D rendering, to help everyone on the project team understand the vision for the space.

Permits

The thought of navigating bureaucratic red tape might dampen your enthusiasm for the bathroom remodel project, but permits are essential for keeping your remodel up to code and legally compliant. It’s important to know when you need a permit and when you don’t so that you can avoid costly fines and potential legal issues.

A permit is needed when you’re making significant changes to the plumbing, electrical, or structural components of your home. This includes moving fixtures, changing their location, adding or expanding your bathroom size, and installing new lighting and outlets. It’s also necessary for changing your bathroom’s ventilation system. However, cosmetic upgrades like painting rooms, repairing plaster, and refinishing floors do not require a permit.

If you’re unsure whether or not you need a permit, it’s best to consult with a licensed contractor. They work through building codes on a daily basis and will know which projects require a permit and which do not. They’ll be able to guide you through the process and handle the permit application on your behalf.

Permits can take time to acquire, especially if your project requires an engineering analysis or the submission of detailed plans and specifications. However, by being proactive and scheduling inspections early in the project, you can help speed up the permitting process. It’s also important to have all required documents and permits on hand, and to attend inspections in a timely manner.

In addition to avoiding fines and legal issues, obtaining a permit before beginning your remodel will ensure that your project adheres to safety standards. Non-compliance can lead to significant fines and even project halts.

If you’re planning a major remodeling project, it’s a good idea to work with a licensed general contractor who can help you navigate the permitting process. Sweeten offers homeowners a personalized renovation experience by personally matching trusted general contractors to their projects, and providing guidance and support along the way. Contact us to get started with your project today! We’d love to hear your remodeling story.

Installation

The installation phase is where the remodeling process starts to really take shape. It’s the point where design plans transition from paper to reality, and the bathroom begins to take its new form. This is a phase that requires a blend of craftsmanship, precision, and coordination. It involves setting up all the new fixtures, tiles, and cabinetry in a way that’s consistent with the overall design plan. It also involves ensuring that everything is properly connected and tested for safety and functionality.

The first step in installing a new bathroom is to make sure the space is ready for construction. This means clearing the area of all personal items and ensuring that contractors have access to it without obstructions. It’s also a good idea to remove any old fixtures, such as toilets and bathtubs, so that they can be safely disposed of. Next, the walls and floors must be prepped for installation. Depending on the scope of the project, this may involve prepping the floor to receive tile or adding a vapor barrier for moisture protection. It may also involve removing existing fixtures and making any necessary changes to electrical wiring or plumbing.

Once the walls and floors are ready for installation, the new fixtures can be installed. If you’re doing a simple “rip and replace” that doesn’t alter the layout or structural integrity of the room, this will be relatively straightforward. However, if you’re replacing a tub with a shower or changing the location of a fixture like a vanity or sink, then it will be a more involved remodel.

How to Get the Most Out of a Corporate Workshop

Workshop events help employees sharpen skills, improve communication, and overcome challenges. They also show that an employer cares about its staff and foster a continuous learning culture.

Corporate Workshop

Boost your team’s decision-making abilities with a critical thinking workshop. This will teach them to think creatively and explore unconventional solutions to complex problems. Keep reading the article below to learn more about Workshop Aziendale.

A strengths workshop is a great way to foster collaboration and teamwork in your organisation. Using a robust assessment tool like CliftonStrengths (formerly known as StrengthsFinder), these workshops enable participants to identify and develop their strengths, which in turn leads to better performance and improved teamwork.

One key element of a successful workshop is managing the expectations of the attendees. Providing them with an overview of what the program entails and explaining how it will benefit their professional growth can help them be more engaged throughout the workshop. In addition, sharing testimonials or feedback from past participants can help them understand the value of the CliftonStrengths framework.

Strengths Finder is an online assessment that identifies a person’s natural talents. It takes about 30 minutes to complete and gives participants a personalised strengths report. It pinpoints their top 5 themes and 34 distinct strengths, which helps them focus on what they do well. The assessment also provides ideas on how to improve their strengths and suggests ways they can be used in the workplace.

After completing the assessment, participants will be able to discuss their results with the facilitator. Then, they will learn how to apply their strengths at work and see the positive impact it can have on their overall wellbeing. Strengths workshops are a great opportunity to network with peers from other departments and expand your professional circle. In addition, many of these events include follow-up sessions to maintain momentum and encourage ongoing conversations.

It is important to note that not all strengths are equally valuable at work. In fact, some strengths may become weaknesses if they are overused or underdeveloped. This is why it is important to have a balanced and diverse workplace.

A thriving workplace is one that promotes the development of all employees and supports their career aspirations. To achieve this, leaders need to ensure that they are building a strong foundation for success. By implementing a strengths-based approach, they can build a collaborative, trusting environment and improve their productivity and efficiency.

Inner Child

Inner child work is a therapeutic process that involves exploring and addressing the negative emotions that were triggered by your childhood experiences. These emotional reactions can cause significant problems in your current relationships, career, and day-to-day life. Identifying the root causes of these negative behaviors is a first step in the healing process, and therapists can assist with this exploration.

During this type of therapy, clients learn how to become more aware of when they’re being triggered by certain situations and people. For example, if you get anxiety about public speaking and react by hiding in the bathroom, this could be a sign that your inner child feels exposed or vulnerable. A therapist would be able to help you understand what emotional trauma or experiences were a cause of this reaction and teach you how to manage it healthily.

There are many different ways to approach inner child work, and it’s important to choose a therapist who has experience with this type of therapy. One common method is to journal about your experiences and feelings. This can give you a better understanding of why you’re reacting negatively or unhelpfully, and it also allows you to look back at your progress over time.

Another way to connect with your inner child is through visualization. You can imagine a younger version of yourself and visualize this person as standing in front of you. In this visualization, you can then act as a nurturing presence for this young person by offering love and support. For instance, you can offer physical comfort by rubbing their shoulders or holding their hand. You can also provide emotional comfort by listening to their needs and assuring them that you will be there for them.

The inner child is an essential part of our personality, but it can be a tricky aspect to deal with. Some people may feel skeptical about the existence of this internal child, while others may find it challenging to engage with this part of their self. Regardless of these feelings, it’s important to explore this area of yourself, as it can be a valuable tool in healing past wounds and developing healthy relationships.

Customer Journey Map

A customer journey map is a tool that helps businesses identify and prioritize opportunities for improvement. It can be used to create better experiences, increase satisfaction and loyalty, and enhance business performance. It is a collaborative process and requires the participation of multiple stakeholders in the organization. To facilitate this, it is important to use the right workshop structure. It should be adapted to suit the specific journey being mapped and the goals of the workshop. Whether using an online customer journey mapping software or a face-to-face workshop, it is important to ensure that participants are fully engaged. This is often achieved through a combination of hands-on activities and lecture-based sessions.

Choosing the right facilitator is also critical. An external facilitator can bring specialized expertise to the workshop and provide a fresh perspective. They can also help participants understand how to use the data they have collected. This can be especially helpful for teams who are new to journey mapping.

The first segment of a customer journey mapping workshop typically involves creating a buyer persona. This is a representation of a typical customer based on the demographics, psychographics, and behaviors of the group you are targeting. This step is essential to understanding the customer and their needs. Without it, your marketing efforts will be broad and ineffective.

Once the buyer persona has been created, the workshop moves on to identifying pain points. This can be done through a variety of methods, including interviewing customers and employees. For example, you could ask employees about the steps they take to resolve a problem with your product or service and ask customers to share their experiences.

After identifying the key pain points, the next step in the workshop is to come up with solutions. Using the pain points as inspiration, the team will generate big ideas. This can be done by giving them a time limit and encouraging them to think creatively. They can then place the ideas on a chart and discuss them.

The final stage of a customer journey mapping workshop is to create a future state of the customer experience. This can be done through a series of brainstorming and presentation rounds. This can be a difficult task, but it is vital for determining how the company will improve the overall customer experience.

Digital Training

Digital training tools are essential for enabling participants to make the most out of workshops and meetings. These include interactive tools to promote interaction, engagement and collaboration in virtual meetings, webinars and other online events. Whether it is a tool that allows for polling, quizzing or visualizing responses or a more robust chat and whiteboard platform to enable participants to share ideas, these types of tools can help keep workshop attendees focused and engaged.

In addition, there are tools that can be used to identify workshop participation levels and provide feedback in a way that is relevant for an online environment. For example, many workshops and meetings are held on a tight schedule and often times they are tacked onto an existing meeting agenda. In these cases, the workshopping tools must be easy to use and quick to setup so that the team can get back to the business at hand.

When selecting a workshopping tool, it is also important to consider the overall user experience. For instance, a workshopping tool should be intuitive and easy to navigate for facilitators as well as participants. The tools should also be able to support asynchronous communication between teams and facilitate the sharing of content and resources, and allow for back-and-forth discussion without the need for email.

Other important features to look for in a workshopping tool include the ability to capture and archive the content shared during the event. This can be useful for future reference and to ensure that all the key insights and outcomes are captured. Another useful feature is the capability to create and update a backlog of items based on votes or evaluations. This can be especially helpful for workshops that run on a limited timeframe as it allows for immediate prioritization and a clear indication of what work needs to be done.

A reliable virtual workshop platform will provide a range of features to meet the different needs of facilitators and participants. The best platform will offer seamless integration capabilities and a collaborative interface that emulates an in-person meeting. In addition, the platform should have a flexible price structure and adhere to stringent security measures.