Pest Control Chesterfield MO is a practice that manages the presence of pests. It aims to keep living locations like homes, gardens, and agricultural land pest-free.
Threshold levels have been established for many pests that require action if they are to cause unacceptable harm. Scouting and monitoring can help determine if these thresholds have been reached.
A pest control practice should seek to prevent a pest from occurring rather than simply treating the problem once it occurs. This approach saves time and money, reduces environmental risk, and may minimize the need for pesticides. Prevention can be achieved by recognizing that pests often occur under particular environmental conditions and by preventing those conditions from happening, such as keeping plants healthy and free of disease organisms. Prevention also can be accomplished by eliminating entry points into a building or site. This might include caulking cracks and sealing holes or inspecting food shipments to ensure that no pests have been introduced.
Integrated Pest Management (IPM) is an ecosystem-based strategy that focuses on long-term prevention of pests or their damage through biological control, habitat manipulation, change in cultural practices and use of resistant plant varieties. IPM programs use pesticides only when monitoring indicates that they are needed according to established guidelines, and pesticides are used with the goal of removing only the target organism.
Threshold levels have been determined for many pests that indicate when action is necessary, based on economic, health or esthetic considerations. It is important to establish and monitor these thresholds so that pest control actions can be planned and executed as required.
IPM programs usually begin with monitoring to identify the pests present and the extent of their damage. Correct identification is critical, as different control methods are required for each stage of the pest’s life cycle. For example, to decrease aphid populations, early releases of the predatory mites Stratiolaelaps or Amblyseious fallacis can be used to attack them in the egg, nymph and larval stages respectively.
In most outdoor settings, eradication of pests is not a realistic goal. However, it is possible in certain enclosed situations such as homes and some commercial and institutional buildings. Eradication may be achieved through exclusion or quarantine, repulsion, physical removal and sterilisation programmes.
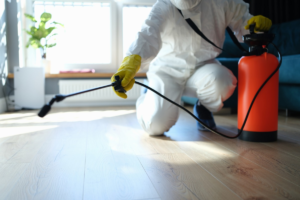
Whenever pesticides are used, they should be applied sparingly and with the aim of reducing their impact on non-target species, such as humans, beneficial insects, birds and other animals, and the environment. This can be achieved by using baits and traps, avoiding spraying in general, and only applying chemicals when the target pest is actively damaging the environment. Always read and follow a pesticide product’s label instructions, warnings and safety precautions.
Suppression
The goal of pest control is to prevent infestations or damage by reducing the number of pests. This may be accomplished through exclusion, deterrence, biological control, physical removal or chemical treatment. In homes and urban environments, prevention can include:
- Sealing cracks.
- Removing weeds around the house.
- Covering garbage cans and eliminating places where pests can breed.
In the garden, it means storing vegetables in tightly closed containers, removing fallen leaves and berries promptly, fixing leaky plumbing and putting away food scraps.
Suppression of pests is usually more difficult than prevention because it depends on changing the environment. Some pests are opportunistic; they move from plant to plant, searching for food and shelter. Others are seasonal; they recur at certain times of the year, such as squirrels and mice in winter or caterpillars in summer. Many of these pests can be controlled through cultural methods such as altering the amount or timing of irrigation, increasing plant resistance or using resistant varieties. Chemical controls can also be effective, but these should be used sparingly and with great care to minimize adverse impact on beneficial organisms, wildlife or the environment.
Preventing pests is easier than getting rid of them, but it takes vigilance. It is important to keep records of pest activity, such as scouting and monitoring, so that action can be taken when necessary. Threshold-based decision making is key; a few wasps flying around doesn’t warrant spraying, but an overwhelming number of them suggests it’s time to take action.
Some of the most effective controls are natural, such as predators, parasites and pathogens. These are sometimes augmented by artificial techniques such as releasing more of the pest’s enemies or adding other factors to suppress the pest population, like pheromones or juvenile hormones.
Other physical or mechanical pest control methods include screens, barriers, traps and fences. These can be effective, but often require maintenance and frequent repairs. Devices that change the environment such as radiation, electricity and water temperature can be helpful as well. For example, covering a field with netting or flooding it can disrupt the reproductive cycle of insect pests.
Control
Pests cause inconvenience to our lives by damaging the environment, crops, and houses. They can also spread diseases to human beings and animals. They can be bacteria, fungus, birds, weeds, rodents, or invertebrates like mites, insects, and ticks. Therefore, we need to use pest control practices to clean up our environments and protect ourselves from their harm.
Integrated Pest Management (IPM) is an ecosystem-based approach to pest management that involves preventive rather than reactive measures. It uses a combination of methods to reduce pest populations to below harmful levels, including habitat manipulation, cropping patterns, plant resistance, and the use of nontoxic materials. Pesticides are used only after monitoring indicates they are needed according to established guidelines and are applied in a manner that minimizes risks to humans and other organisms.
In the garden, preventing pest infestations can be as simple as inspecting plants regularly and handpicking any offending insects or grubs. Many gardeners also add compost to the soil to help promote beneficial microorganisms, which can keep pests at bay.
Other preventive measures include keeping grass mowed to a healthy length, maintaining a proper watering schedule, and choosing tolerant plants or trees. If you are experiencing a pest problem, hiring professional pest control services is a good idea. They have the right knowledge and expertise to completely eradicate pests. They will provide you with treatment plans that can be continued until the pests are eradicated.
A more proactive measure is biological pest control, which relies on predators, parasitoids, or disease organisms that ordinarily occur in nature to reduce pest population levels. This method can be augmented by using natural enemies that are bred in the laboratory and then released in small batches or in a large-scale release. These enemies are usually more effective at controlling the pests than their natural counterparts, but they may not completely eradicate them.
Pests can be a major liability for businesses. They can damage property and lead to the loss of customers. Furthermore, they can be a health risk to employees. For this reason, it is crucial that businesses follow food safety and hygiene standards to prevent pests from infesting their establishments.
Monitoring
Part of the Integrated Pest Management (IPM) approach to pest control, monitoring is a key component in determining whether or not to begin pest suppression tactics. Generally, this involves regularly searching for and identifying pests, estimating their abundance, and evaluating the severity of their impact on plant health or aesthetics. Monitoring also includes tracking environmental conditions, including temperature and moisture levels, to help predict when a pest outbreak is likely to occur or exceed action thresholds.
IPM programs focus on preventing pests from damaging crops, rather than killing them after they do damage. Prevention strategies include avoiding the use of harmful chemicals and using preventive maintenance to keep pests out. For example, sealing cracks and crevices in a building is more effective than spraying all the interior surfaces with a toxic insecticide, because it targets the pests’ entry points.
Scouting for and identifying pests is a key part of monitoring, and should be done on a regular basis, anywhere from daily to weekly depending on the pests in question and their environment. Scouts should develop a routine route and note the locations of places where pests might be hiding. For example, looking under leaves or along the foundation of a structure may help identify the hiding spots mosquitoes lay their eggs. Scouts should be sure to check for the presence of predatory insects, as well – for example, a few house centipedes or spiders in a museum can be beneficial, as they feed on pests that might otherwise damage collection items.
The identification of pests is important, because IPM relies on an understanding of the biology of the pest to determine the proper control method. For example, applying pheromones can reduce pest populations by disrupting mating habits, while spraying with an insecticide is a last resort when less risky controls aren’t effective.
In summary, a museum with an IPM program can greatly reduce its dependence on toxic chemical pesticides while safeguarding collections. By scouting for and monitoring pests, instituting preventive controls, excluding pests from the building, and treating only when necessary, a museum can minimize both the cost and environmental impact of pest control.
